Creating a React Native “Curved Bottom Bar” with Handwritten SVG
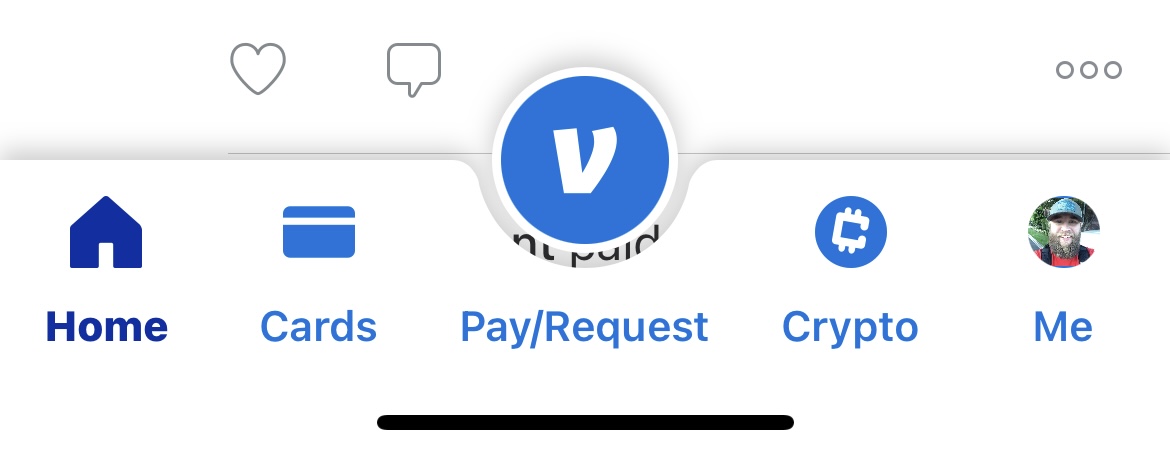
I’m building my first full React Native app right now for a client and ran into a challenging problem right away. There’s a trend in native apps for the bottom tab bar to have a cutout for a larger circular action button right in the middle. I’ve seen it called the “curved bottom bar” in my research. To make it clear what I’m talking about, let me share the first example I found on my phone, which was from Venmo:

Notice that you can see the text of an item beneath and through the cutout. That’s a key feature of this design. In researching how to accomplish this, I found several libraries, but none of them were ready to work with the routing we’re using in the applications. I was going to have to do it from scratch.
What I found was most people accomplished this using SVG, which is ironic given that React Native doesn’t natively support SVG. What I found interesting about how they were accomplishing it was their use of d3’s d3-shape package instead of writing the SVG by hand, which is remarkably easy to do. Let me prove it to you.
Through the course of this post, we’re going to build this:
We’ll do it step by step, so you can follow along.
Writing SVG by hand is a lot simpler than you might suspect. It reminds me of learning regular expressions. It looks really intimidating, but once you learn a few things, it becomes far less scary. We can combine some basic SVG skills with “parametric design” principles to create a custom shape that will be perfect thanks to math.
Everything I’ve ever learned about writing SVG by hand comes from this: The SVG Pocket Guide. It’s a wonderful resource and I go back to it time and time again. I encourage you bookmark it, as I’m sure you’ll do the same.
Drawing the shape
We’re going to draw this shape using a path element. Drawing a path is a lot like giving instructions to a someone with a pencil. Start here, go there. Move to here, draw a line to there. Close the loop. You just have to learn how to read the way we give the path those instructions.
We’re going to partner this with parametric design by using variables. These variables will describe certain values we want in our path. That way, if we want to tweak something, we just tweak a variable and our path updates.
We’re going to build a basic rectangle first as the foundation of our shape. We’re going to start in the bottom-left corner of the rectangle and work our way around the shape clockwise. Let’s see the code, and then I’ll break it down.
const WIDTH = 320
const HEIGHT = 48

/**
 * Line by line explanation
 * - Start in the bottom-left
 * - Draw a line to top-left
 * - Draw a line to top-right
 * - Draw a line to bottom-right
 * - Close the path
 */
const d = `
M0,${HEIGHT}
L0,0
L${WIDTH},0
L${WIDTH},${HEIGHT}
Z
`

function Shape() {
  return (
    <svg width={WIDTH} height={HEIGHT}>
      <path d={d} />
    </svg>
  )
}
We’ve stored some values for the width and height of our shape and we can change those to suit our needs. Next, we’ve created a d variable, which is the value we hand to our path element. Let’s break down this string further.
M stands for moveTo. We’re giving our path the instruction of moving to the bottom-left of our shape. Coordinates work as if 0,0 is the top-left of our space, moving positively to the right and down. This makes ${WIDTH},${HEIGHT} the bottom-right of our shape. If you’re wondering why we started in the bottom-left, those reasons will reveal themselves soon.
So we’ve moved to the point of 0,${HEIGHT}. Next, L stands for line. More specifically, draw a line from our current point to the next point. So when we say L0,0, we’re drawing a line from the bottom-left to the top-left of our shape.
From there, we make two more lines to the top-right and bottom-right of our shape. However, we don’t draw a third line back to the place we started. Instead, we use the Z command. This tells the path to “close”, which returns to where we started. Thus, we get this shape:
Next, let’s add the rounded top corners. That update looks like this:
const WIDTH = 320
const HEIGHT = 48
const CORNER_RADIUS = 12

/**
 * Line by line explanation
 * - Start in the bottom-left
 * - Draw a line towards the top-left to the start of our corner radius,
 *    use the top-left as the curve control point,
 *    and curve to the other end of our corner radius
 * - Draw a line towards the top-right to the start of our corner radius,
 *    use the top-right as the curve control point,
 *    and curve to the other end of our corner radius
 * - Draw a line to bottom-right
 * - Close the path
 */
const d = `
M0,${HEIGHT}
L0,${CORNER_RADIUS} Q0,0 ${CORNER_RADIUS},0
L${WIDTH - CORNER_RADIUS},0 Q${WIDTH},0 ${WIDTH},${CORNER_RADIUS}
L${WIDTH},${HEIGHT}
Z
`

function Shape() {
  return (
    <svg width={WIDTH} height={HEIGHT}>
      <path d={d} />
    </svg>
  )
}
We added a variable and a few instructions! Let’s break them down.
CORNER_RADIUS describes how far we want to start the curve from the corners. We can add or subtract that value from other values to properly place the start and end points of our curves, and the Q command is how we make those curves.
Q stands for “quadratic bézier curve” and it takes two coordinates for its command: the control point and the end point. Think of it this way, a segment of path is drawn from the start point to the end point. Then, the control point is moved to change how the line curves between the start point and end point.
So when we see:
L0,${CORNER_RADIUS} Q0,0 ${CORNER_RADIUS},0We’re telling the path to draw a line to 0,12, use 0,0 as the control point, and curve to 12,0. If we change the value of CORNER_RADIUS, then it would change which points it uses.
When we render our new shape, we get:
Next, let’s work on the cutout semi-circle in the middle. We can use math to get this centered and curved correctly. We’ll be adding quite a few variables, so don’t get overwhelmed. They’ll make sense soon enough.
const WIDTH = 320
const HEIGHT = 48
const CORNER_RADIUS = 12
const CUTOUT_RADIUS = 30
const CUTOUT_LEFT_X = WIDTH / 2 - CUTOUT_RADIUS
const CUTOUT_RIGHT_X = WIDTH / 2 + CUTOUT_RADIUS

/**
 * Line by line explanation
 * - Start in the bottom-left
 * - Draw a line towards the top-left to the start of our corner radius,
 *    use the top-left as the curve control point,
 *    and curve to the other end of our corner radius
 * - Draw a line to the left edge of our cutout
 * - Draw an elliptical arc with an equal x and y radius to create a circle,
 *     have 0 rotation on the x-axis,
 *     use the smaller arc (we could use either as they are equal),
 *     sweep the arc in a counter-clockwise direction,
 *     complete the arc on the right cutout point
 * - Draw a line towards the top-right to the start of our corner radius,
 *    use the top-right as the curve control point,
 *    and curve to the other end of our corner radius
 * - Draw a line to bottom-right
 * - Close the path
 */
const d = `
M0,${HEIGHT}
L0,${CORNER_RADIUS} Q0,0 ${CORNER_RADIUS},0
L${CUTOUT_LEFT_X},0
A${CUTOUT_RADIUS},${CUTOUT_RADIUS} 0 0 0 ${CUTOUT_RIGHT_X},0
L${WIDTH - CORNER_RADIUS},0 Q${WIDTH},0 ${WIDTH},${CORNER_RADIUS}
L${WIDTH},${HEIGHT}
Z
`

function Shape() {
  return (
    <svg width={WIDTH} height={HEIGHT}>
      <path d={d} />
    </svg>
  )
}
We start by defining a CUTOUT_RADIUS, we can increase or decrease this value to make the cutout larger or smaller. Next, we derive a few useful values, namely the x position for the left and right side of the cutout. Then we draw an “arc”.
That’s what the A is for, an “elliptical arc”. This command takes a lot of values, but because we’re making a semi-circle, we’re able to simplify a few of them. The first value is the x-radius and y-radius of our ellipse. One way to think of a circle is as an ellipse whose focii are both in the center, meaning both radii are equal. That’s what A${CUTOUT_RADIUS},${CUTOUT_RADIUS} represents.
The next value determines the rotation of the shape on the x axis. Since there is no rotation, the value is 0.
Next, we have the “large-arc-flag”, essentially a boolean to determine if we want the larger or shorter of the two arcs produced by an ellipse. In our case they are equal, so we could use either 1 or 0.
The next value is the “sweep-flag”, meaning should we draw our arc in a clockwise (1) or counter-clockwise (0) direction. Since we’re going from the CUTOUT_LEFT_X down and to the right, we use 0 for our value.
Lastly, we identify the point the arc should complete at, ${CUTOUT_RIGHT_X},0 and we’ve completed our arc. It looks like this:
From here, all we need to do is absolutely position this in the correct spot in our UI and build our buttons and tabs on top of it. If we need to make tweaks later, all we need to do is update some of the variables.
Summary
We don’t always need a library to draw SVG in an understandable way. It just takes a little bit of effort to understand the available commands.
Using variables to control aspects of our SVG allow us to tweak and modify our shape in a way that we know will always work. We could even hook these values into inputs and sliders to adjust them as we see fit.
I hope you feel less intimidated about SVG now that you’ve seen how to draw some of it by hand and inspired to try and use this technique in some of your own work.

