My git Workflow for Refactoring
If you’ve followed me for any significant amount of time, then you might know that Refactoring by Martin Fowler is the most influential book on writing software I have ever read. It fundamentally changed my approach towards writing code.
The book influenced me so greatly that it led to a change in my git workflow. Adopting the strategy I’m about to show you made it easier for me to refactor code, build upon that change, and get it reviewed quicker than ever. If you work in an organization that uses pull requests and code reviews, I believe this workflow will help you do the same.
The gist of my workflow is this:
- Make a branch for only the refactoring work, submit the PR
- Then, make a branch off of the refactoring branch, not
mainfor your feature work, and set the base to the refactoring branch when you submit the PR
Some groundwork first
Before we get into the finer details of this workflow, I want to provide a little more context as to why I think it’s a good idea to make changes this way.
First, I think it’s a really bad habit to refactor and make changes in the same pull request. This practice is extremely common, but it comes with some major downsides:
- It’s not really a refactor, by definition
- It’s harder to differentiate between what was refactored vs. what was added, what was necessary to change and what wasn’t
- It creates large PRs, which are more likely to be “rubber stamped” and therefore, more error prone
Second, I recognize that many organizations’ processes are designed to incentivize large PRs. Anything from compliance requiring separate tickets for every change (so you just stuff it all into one ticket), to the overwhelming pressure to pump out features. I understand there are factors working against you sometimes. My hope is that this strategy fits in that system, as it has for me.
So without further ado, let’s break this bad habit and explore this workflow now.
Our example
I figured it would be best to work through an example to demonstrate the process. Our codebase has a rudimentary Button component. It currently has two implicit variants, a primary and secondary style. Let’s look at how it was implemented.
const SHARED_STYLES = {
  borderRadius: 9999,
  fontFamily: 'sans-serif',
  padding: '0.35em 1em',
}

const PRIMARY_STYLES = { backgroundColor: 'blue', color: 'white' }
const SECONDARY_STYLES = { backgroundColor: 'lightGray', color: 'black' }

type Props = {
  children: React.ReactNode
  onClick: () => void
  isSecondary?: boolean
  type?: 'button' | 'submit' | 'reset'
}

function Button({
  children,
  onClick,
  isSecondary = false,
  type = 'button',
}: Props) {
  const variantStyles = isSecondary ? SECONDARY_STYLES : PRIMARY_STYLES

  return (
    <button
      onClick={onClick}
      style={{ ...SHARED_STYLES, ...variantStyles }}
      type={type}
    >
      {children}
    </button>
  )
}
We can use our Button component like so:
<Button onClick={() => {}}>Primary Button</Button>
<Button onClick={() => {}} isSecondary>Secondary Button</Button>
And it looks like:
Now that we know our starting point, let’s consider our task. We need to add a third variant, the danger button, without regressions. How should we do this?
Step 0: Write some tests
In the Refactoring book, Fowler makes it clear that a proper refactor changes the organization and structure of the code without changing its functionality. In order to verify that no functionality has changed, we need tests in place that can assert the correct behavior.
In the case of our buttons, we’d have functional tests ensuring the button worked when clicked, or didn’t when disabled, etc. We’d also be well served to have visual regression tests, perhaps with something like Storybook. So before we go refactoring, make sure you can verify that everything works exactly as it did before.
If you do need to write some tests, I recommend making this PR first. You can then build your refactor branch off of the testing branch, similar to how we’re going to make our feature branch off of our refactoring branch later on.
Step 1: Refactor
Assuming we have tests ready to go in our main branch, we’ll start by creating a branch off of main for our refactor:
git checkout -b refactor-buttonNow that we’re on new branch, we can make our changes. Adding a danger variant will be very cumbersome if we have to deal with booleans. Booleans are a poor choice for representing finite states and could lead to weird situations that leak implementation details.
A better choice than an isSecondary prop, is a variant prop that takes a string. We’ll use TypeScript to define this string as a union of our variants, like so:
type Variant = 'primary' | 'secondary'

type Props = {
  children: React.ReactNode
  onClick: () => void
  type?: 'button' | 'submit' | 'reset'
  variant?: Variant
}
Now that we’ve added Variant to our types, we can make objects that use Variant as a key to create maps for our styles, like so:
const VARIANT_TO_STYLES: Record<Variant, React.CSSProperties> = {
  primary: { backgroundColor: 'blue', color: 'white' },
  secondary: { backgroundColor: 'lightGray', color: 'black' },
}
And we can now use that map in our component:
function Button({
  children,
  onClick,
  type = 'button',
  variant = 'primary',
}: Props) {
  const variantStyles = VARIANT_TO_STYLES[variant]

  return (
    <button
      onClick={onClick}
      style={{ ...SHARED_STYLES, ...variantStyles }}
      type={type}
    >
      {children}
    </button>
  )
}
From this point, we can git add our changes and commit them.
git add .
git commit -m "refactor button with variants"
git push origin refactor-button
After pushing our branch to remote, we can make a PR for our changes.
Step 2: Adding our danger variant
Before we make our additional changes, we’re going to make a new branch off of our refactoring branch. So ensuring we are currently on the refactor-button branch, we can then make our new on:
git checkout -b update-button-with-danger-variantOur work is fairly straightforward from here. We’ll add 'danger' to our Variant type:
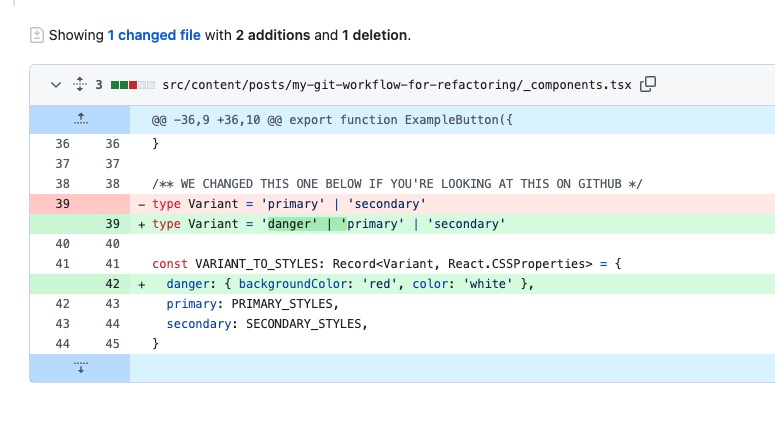
type Variant = 'danger' | 'primary' | 'secondary'We’ll add danger styles to our style map:
const VARIANT_TO_STYLES: Record<Variant, React.CSSProperties> = {
  danger: { backgroundColor: 'red', color: 'white' },
  primary: { backgroundColor: 'blue', color: 'white' },
  secondary: { backgroundColor: 'lightGray', color: 'black' },
}
And we’re done! That’s literally all we have to do to add our new variant.
From here, we can add, commit and push our changes:
git add .
git commit -m "add danger variant to button"
git push origin update-button-with-danger-variant
Up to now, all of this work has been the same, but we need to make a key change with our PR. We need to change the base from the main branch to our refactor-button branch.
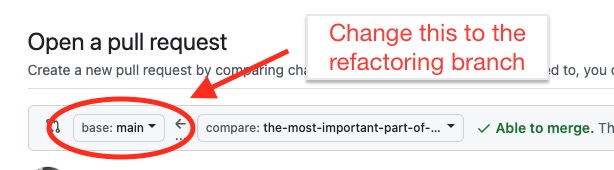
Take a look at the “Files Changed” tab when we do. Notice, only the changes we’ve made since the refactor are there.
If we had kept the main branch as base, then we’d see changes from both the refactoring and our danger addition. This makes sense because we made our updates on a branch that was made from the refactor-button branch. But by changing the base, we’re able to only see the diff between the refactor-button branch and our current branch. We’ve shrunk the git diff considerably, and hopefully shrunk the time to review each PR considerably, too.
I should be clear, if there are any tests we need to add for our new feature, we should add them now as well.
Step 3: Review & Merge
At this point, we’ve submitted two PRs, which may seem like twice the work for code reviewers, but I would say it’s actually less than the amount of work of a single PR.
If both of these changes were in a single PR, you’d have to verify that both the refactor was done correctly, and that the addition worked correctly. There’s additional work of review buried in this integration.
When we split them into 2 PRs, they become simple verifications. The refactoring PR simply asks us to verify the tests continue to pass. If they do, then we’re ok (assuming the quality of the tests).
The second PR simply asks if we’ve implemented the new feature. It would be easy to spot if we made an unrelated or additional changes at this stage that need to be addressed.
In the review process, you may realize that there are updates you need to make to the refactoring branch. This is not a problem. Checkout your refactoring branch, make your changes, commit and push. Once you’ve done that, you can switch to your feature branch, and git rebase the refactoring branch on to it. This will move the commits of your feature branch to after the commits of the refactoring branch, maintaining the correct history. You can fix any conflicts that arise here, though they should be relatively small and few.
Once your PRs have been reviewed, merge the refactoring branch first. This will automatically update the base of your feature branch back to main, allowing you to easily merge that branch in as well.
Summary
Refactoring is a part of writing quality code, and while our processes might not make it as easy to do as we like, there are strategies we can take to make them as easy on ourselves and others to review.
If we can build the habit of making our refactoring PR first, and building our feature on top of that branch, we can start to make code changes and reviews easier for everyone we work with.
I hope you find this git workflow useful. Let me know if you or your team starts to adopt something like this.
Additional resources
While I believe they have recently changed their product offering a bit, their is a tool out there that can do a lot of this automatically for you. It’s called Graphite and I encourage you to check it out. I’m not the most persuasive person, so I’ve never tried to convince a team to try it, but I think it could be very useful to a team willing to adopt it.